Employer Reporting Application Portal

Update payroll information


Back to Help Menu

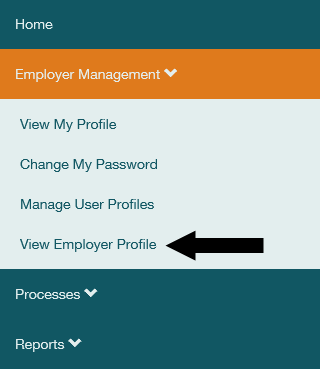
1.       Select Employer Management.

2.       Next, select View Employer Profile

ERA Navigation Menu with arrow pointing to View Employer Profile link.


3.       Select Update Employer Profile at the bottom of the screen.

ERA Employer Profile screen with arrow pointing to Update Employer Profile button.

4.       In the Update Type field, use the  (▼ or ◀)  to expand the dropdown menu to select Payroll Information, then select Add Update.

ERA Employer Update screen with arrow pointing to  in Update Type drop down menu and one to the Add Update button. 

5.       A popup screen will display listing your current report groups. Find the Report Group you want to update then select the   at the right side of the row.  On the resulting screen, enter the Next Payroll Date.

ERA Payroll Information screen with arrow to the pencil icon on the far right. 

6.       In the Notification Days field, enter the number of days before that date that you would like to receive a notification to the message center reminding you that your report is due.

7.       If you are entering payroll information for a DCP system, the Cutoff Days field will be available. Enter the number of days before each payday that you would like access to the DCP change report and to submit your regular report. Member rate changes submitted after this date are effective during the next payroll. If this field is not visible, skip to step 5.

8.       If you are entering payroll information for a DCP system, and have a calendar type of Monthly or Semi-Monthly, the Special Year End Date field will display. Enter the day of the month (1-31) you will use for end of the year reporting. If your organization does not have Special Year End Reporting, enter 0. If this field is not visible, skip to step 5.

9.       Select your payroll calendar type. New fields will appear based on your selection.
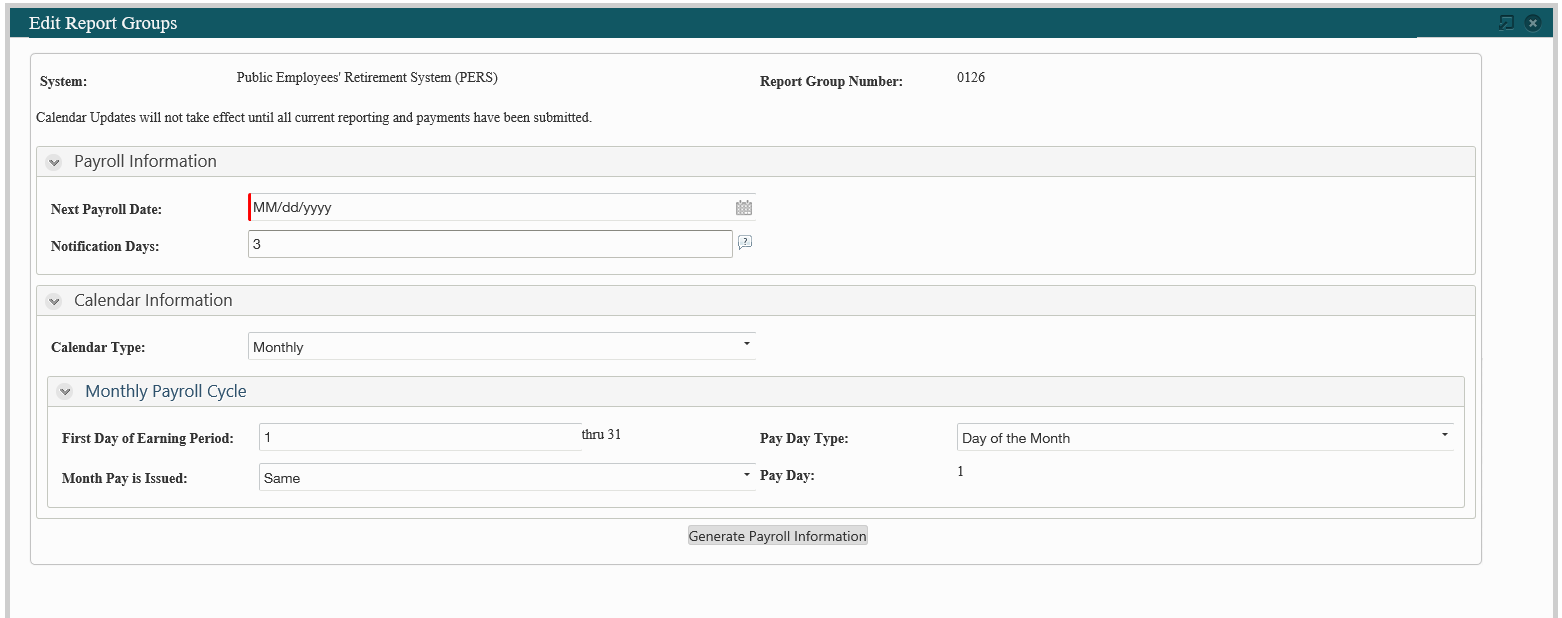
  • Monthly
    • Enter the first day of the earning period. The system will automatically calculate the last day of the period based on the information you enter.
    • For Pay Day Type, select Day of the Month if pay day is the same date each month. Select   Day of the Week if pay day is the same week and week day each month (for example, every first Thursday). The system will calculate the Pay Day based on your selection and he Next Payroll Date entered above.
    • In Month Pay is Issued, choose whether the Pay Day falls in the same month as the end of the pay period, or the next month.
  • Semi-monthly
    • Enter the First Day of Earning period for both the First Earning Period of the month and the Second Earning Period of the month. The system will automatically calculate the last day of each earning period based on the information you enter.
    • Choose Day of the Month for Pay Date Type if your organization issues pay on the same date each month. Choose Day of the Week if pay day is the same week and weekday each month (for example, every first Thursday). The system will calculate the Pay Day of the First Earning Period based on your selection and the Next Payroll Date entered above. Verify this number, and enter the Pay Day for the Second Earning Period.
  • Bi-weekly or Weekly
    • Enter the number of days between the end of the earning period and the pay date. The system will automatically calculate the Earning Period based on this information and the Next Payroll Date entered above.

ERA Edit Report Groups screen with fields for Payroll Information, Calendar Information, and Monthly Payroll Cycle. 

10.   Select Generate Payroll Information. Dates for the current earning period will be calculated automatically. Review the Payroll Calendar Dates. If changes are required, make corrections to the Payroll and Calendar Information then select Generate Payroll Information again.

11.   If the dates calculated do not match the Projected Reporting Information we have on file, a message will alert you to either make corrections to your entries or, if changes are needed, to contact DRS.

12.   Select Save.